How to Install Led Headlights in Jeep Wrangler
Talk to Wrangler Enthusiasts
1-877-870-8556
M-F 8:30A-11P, Sat-Sun 8:30A-9P

-
 Shop Wrangler Select Year
 - Change Vehicle
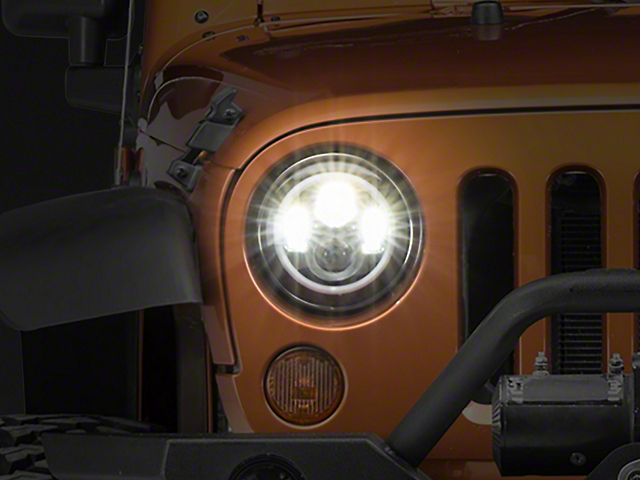
Axial LED Halo Headlights with DRL and Amber Turn Signals; Black Housing; Clear Lens (97-18 Jeep Wrangler TJ & JK)
Item J108037

Call a Wrangler Enthusiast at 1-877-870-8556
M-F 8:30A-11P, Sat-Sun 8:30A-9P
Video Review & Installation
Hey, what's up, guys? I'm Ryan from Extreme Terrain and today, I'm here with the Axial LED headlights with daytime running lights and amber turn signals, fitting your 1997 to 2018 Wrangler TJ and JK. This is going to be for the Jeep owner that is looking for a very affordable set of LED headlights with Halos to make those nighttime drives a little more enjoyable. This a great upgrade for any Wrangler owner whether you are trail riding or just cruising the streets. These high-powered LED lights are sealed in a tough housing and a lot brighter than your stock halogens. These feature a dual-function Halo that acts as a white ring for your daytime running lights and amber when you activate your turn signals. These are DOT and SAE approved, keeping you legal and safe on the street. These come complete as a kit with everything needed to install, including all of those adapters and harnesses that you will need. Now, these are very reasonably priced on the site as far as these LED headlights go and at just around $130, this is not only going to be your most affordable option, but honestly, in my opinion, it's one of the best looking.Now, as far as the install goes, I am going to give this one out of three wrenches as you can install this in about an hour using basic hand tools. Now, with that being said, let's hop into in the install. Tools required for this install, a test light, wire crimpers and snips, T15 Torx, 11-millimeter wrench, and some electrical tape. All right, so to begin this installation, the first thing we're going to do is start at the front of the Jeep. You're going to have these little bezels on the TJ, and they're gonna have three screws in them. We're gonna use a T15 Torx so we can remove those three screws. We pull these bezels off so we can access the headlights. After you get those three screws out, we're going to pull this bezel out. So, now that we have that bezel off, the next thing we're gonna do is remove this other bezel that holds our headlight in. We gonna you use that same T15 Torx, then you're gonna have three screws on the outside. Then you want to place a hand on the headlight when you take that last screw out because it will fall out.Then we gonna pull the light out and unplug it from our plug. And we'll do the same thing on the other side. Three screws for the bezel and then four screws for the headlight. So, before we get these brand new lights installed from Axial, I just want to take a moment to tell you a little bit about what they're made of, what they're gonna do for your Jeep, and how they compare to your stock ones.Now, the stock ones are a sealed beam and they're halogen light. These halogen lights do not produce a very bright white light and not only that, but they run very hot and they draw a lot of power to operate. LEDs are gonna run a lot brighter and they also use a lot less electricity, up to 65% less usage, which is going to give your alternator a little bit of a break from powering all these lights up.Now, your low beam is about 3,600 lumens and your high beam is about 5,400. These have a built-in dual-function Halo. This Halo is going to light up white for your running lights and it's going to flash orange for your turn signals. Now, these are sealed in a rugged housing. They have a polycarbonate lens, which is going to be very scratch resistant and protect those internals, and the back of the housing is made from aluminum. This is black powder coated. So, this whole thing is going to be very corrosion resistance. It's all sealed up nice and tight, so it's not going to build any condensation or moisture.Now, these are designed to be a direct bolt-in and they come with harnesses to install. So, these are going to work for JKs. They're also gonna work for TJs. We do have to do some wiring to get these Halos to power up as we're gonna tap into our running lights and our turn signals. However, this whole thing is relatively easy to install. So, with all of that being said, let's show you how these get installed, and what they look like on the Jeep. So, the first thing we're going to do with our hood open is we're gonna feed these lights and this harness through.We gonna pass this through and we're gonna seat these in. Now, you're gonna have some writing on the bottom here. You're gonna also have a large bubble. This bubble is going to be on the bottom. These headlights only go in one way, so you can't really put them in backwards. After we do that, we're gonna put our retaining ring back on. And you're gonna have to have these close holes. These are gonna go on the bottom. Once we get that on there, we're gonna reinstall those four screws that we removed. We want to keep a hand on this thing the whole time so it doesn't fall out and crash to the floor.So, since we can access all of our electrical connectors from inside of the engine bay, we're gonna go ahead and just reinstall our bezels right now. So, we're gonna do the same thing for the other side...into those little notches and stay in place. So, the next part of this step is going to be to plug these lights in and wire up for Halos and turn signals. Now, if you have a stock TJ, all of this wiring is going to be most likely inside of your fender. This Jeep clearly has modifications. It has aftermarket fenders and it has aftermarket LED lights. So, most of our wiring is in the engine bay, but it's still gonna be the same colors that I'm going to point out to you. So we're gonna to start here and we're gonna use this harness that they give us in our kit. And you're gonna have this one end with these three wires and these little connectors, we're gonna leave those alone for now. Right now, we're gonna to take our two ends and we'll need to run each one to a light. So, one is gonna to go to our passenger's side, one is gonna to go to our driver's side.So we're gonna to start over here, pass that one over there, and then we're going to take the plug of our new light, we're gonna plug that into our factory harness plug, and we're also going to plug this additional plug into there. So, first we're gonna plug in our factory harness and then we're gonna take this other secondary additional plug, we're gonna go ahead and plug that into our new light. And make sure that that goes all the way in and then it clicks.So, this other one, we need to run it over to our driver's side. So, factory harness is gonna run underneath of our grille. So, what we're gonna do is try to match that and then we'll zip tie all of that, run it over to the other side. So, I'm gonna drop it right down through here. If you can squeeze it through in a better spot, you can do so. Then we're gonna follow this just under along the grille, out to the other side.So, then we're gonna do the same thing. We're gonna plug in our new headlight to that factory harness and we're gonna take that other light and run this underneath of there and plug those two in. So, with the stock TJ, you're gonna have two lights, you'll have one in the front and one as a side marker light. We're gonna pull the power from that side marker light. You're gonna to have two wires, and one wire is going to be for your parking lights, and the other one is going to be intermittent for your turn signal.This yellow wire is gonna go to the turn signals. So on ours, we had a tan wire, however, you should use a wire probe or a test light to make sure that you have the correct wire when tapping into that. Now, you're gonna have a plug on your stock light, so you can use these vampire clips to tap into that. These are gonna to slide over that wire. You'll slide this new wire in. It's going to splice them together.Since our plug was already cut off, what we're gonna do is just butt connect this wire to our harness. So, like I said, we have tan wire. This is our turn signal wire. So, what we're gonna do is just strip the end of this. Then we're gonna take this wire and we're gonna butt connect those two together. So we're gonna to trim a little bit off of this wire since is pretty long. And we'll strip the end of this other wire. Now, we're gonna use butt connectors. Now, with our butt connectors, we're using heat shrink butt connectors that way we can make a nice, tight seal and that way we won't get any water built up in there that's gonna corrode it. So, we're gonna to attach it on our one side first. We're gonna make sure that that slides all the way into that. Also, you might want to twist the ends so it goes in there better. Just slide all the way in, make sure it's all the way in, and then we're gonna crimp that down. Next, we're gonna attach it to this wire. So, we're gonna do the same thing. We're gonna insert that in there, make sure that it goes all the way in, and then we're gonna crimp this other side. Make sure that they stay in there, and then we're gonna move on to the next step.On the other end of this harness, we're gonna have three wires. You're gonna have a black wire, a red wire, and a yellow wire. For this particular install and for this TJ, we're not gonna be using this yellow wire. This black wire is recommended to attach to the ground side, the black side, the negative side of the battery. And this red wire we're gonna power into and tap into our parking lights. That's going to power up the white Halos. So, we're gonna do that first. We've cut our end off and we've stripped this since we're gonna butt connect it right into that wire and actually, our parking light wire is a black with a yellow trace.Once again, you should check with a test light to make sure that you have a constant 12 volt there for your parking light. So, we're gonna strip the end of this, twist those ends, and then we're gonna butt connect these two together. Then we're gonna do the same thing for the other side with that yellow wire. So, with all of that stuff wired up, the next what we're gonna do, since we are not using this yellow one here, we're gonna fold that up and just electrical tape that out of the way. After that, and the last thing that we're gonna do as far as connecting electrical stuff, we're gonna attach our negative terminal to our negative side of our battery.So, we're gonna use an 11-millimeter wrench to loosen this nut up. Now, depending on if your terminals have been replaced or anything like that, that size may vary. So, we're gonna loosen that up and then attach this electrical connector. So, now that we have everything installed, the next thing you're gonna do is just go around and zip tie up all that excess wiring. However, that's gonna wrap up my review and install. For more videos like this, check us out at extremeterrain.com.
Subscribe: New Wrangler videos daily!
Subscribe to our YouTube Channel
Product Information
Features, Description, Reviews, Q&A, Specs & Installation
Features
- 7" Round LED Headlights
- Brighter than OEM for Better Visibility
- Integrated DRL and Turn Signal Halo
- 6000K Cool White Color Temperature Halo
- 5400LM (High Beam) - 3600LM (Low Beam)
- Clear Lenses with Black Housings
- DOT and SAE Certified
- H4 Connector for Easy Installation
- H4 - H13 Wiring Adapter Included
- Anti-Flicker Harness Included
- Additional Wiring Required for DRL/Turn Signal Halo Lights
- Sold as a Pair, Driver and Passenger Side Included
- Intended for use with Factory Halogen Headlight Equipped Models
- LED Headlight Equipped Models will require Factory Halogen Headlight Buckets for Use
- Fits All 1997-2018 Jeep Wrangler TJ and JK Models
Description
Style and Function. Upgrade the appearance and visibility of your 1997-2018 Jeep Wrangler with a set of Axial LED Halo Headlights. These Axial Headlights feature a great looking integrated dual function accent halo. The halo functions as both a Day Time Running Light (DRL) and as a Turn Signal Indicator. The halo glows white as a DRL and amber when active as a turn signal. These Axial LED Headlights will certainly be much brighter than your stock headlights and feature a 6000K cool white color temperature.
Superior LED Lighting. Featuring premium high output LEDs, these Axial Headlights out put 5400 lumens for the High Beams and 3600 lumens for the Low Beams. With a 60% lower power consumption than standard headlights, these LED Lights have a life span of up to 50,000 hours.
Durable Construction. Designed to perform in the harshest of elements, these Axial Headlights feature a rugged housing with a tough as nails clear polycarbonate lens. Each Headlight is epoxy sealed to prevent moisture from harming the state of the art electronics found inside. These Axial LED Headlights can take just about anything the trail can throw at them.
Easy Installation. Axial 7" Halo LED Headlights were engineered to be a direct plug and play replacement for your Wrangler's original stock lights. With the included H4 - H13 wiring harness adapters (needed for 2007+ models) installation can be completed in under 30 minutes. It should be noted that the DRL/Turn Signal halo light will require additional wiring for operation. Installation instructions are included.
DOT and SAE Certified. These Axial 7" Round LED Halo Headlights pass both DOT (U.S. Department of Transportation) certification and SAE (Society of Automotive Engineers) certification requirements making legal for street use.
Application. These Axial 7" LED Halo Headlights with DRL and Amber Turn Signals are designed to fit 1997-2018 Jeep Wrangler TJ and JK models. Driver and passenger side lights are included.
Application Note. These aftermarket LED Headlights are intended for use with factory halogen headlight equipped models. In order to use these aftermarket LED Headlights on a Jeep that is already factory equipped with LED headlights, you will require a set of factory halogen headlight buckets – not included.

Fitment:
- 1997 Jeep Wrangler
- 1998 Jeep Wrangler
- 1999 Jeep Wrangler
- 2000 Jeep Wrangler
- 2001 Jeep Wrangler
- 2002 Jeep Wrangler
- 2003 Jeep Wrangler
- 2004 Jeep Wrangler
- 2005 Jeep Wrangler
- 2006 Jeep Wrangler
- 2007 Jeep Wrangler
- 2008 Jeep Wrangler
- 2009 Jeep Wrangler
- 2010 Jeep Wrangler
- 2011 Jeep Wrangler
- 2012 Jeep Wrangler
- 2013 Jeep Wrangler
- 2014 Jeep Wrangler
- 2015 Jeep Wrangler
- 2016 Jeep Wrangler
- 2017 Jeep Wrangler
- 2018 Jeep Wrangler
Axial J108037
CA Residents:  WARNING: Cancer and Reproductive Harm - www.P65Warnings.ca.gov
Installation & What's in the Box
Installation Info
Installation Time
(approx) 1 Hour
Difficulty Level:
Simple installation for anyone.
What's in the Box
- (2) Headlights
- (2) H4 - H13 Adapter Harness
- (2) Anti Flicker Box
Tech Specs
4.2
Customer Reviews (100+)
Questions & Answers
Related Wrangler Categories
Recently Viewed
How to Install Led Headlights in Jeep Wrangler
Source: https://www.extremeterrain.com/axial-led-halo-headlights-w-drl-amber-turn-signals-9717.html